How to create learn courses and learn revisions, assign learn courses to existing users and check who has complete learn courses.
| How to Create a Learn Course |
| Learn Declaration Options |
| How to Create a Learn Revision |
| How To Assign a Learn Course to an Existing User |
| How to check who has not completed/completed Learn Courses |
How to create a learn course
1. Click the 9 dots on the top right corner next to your name, then click 'Trainer'.
2. Click Account Settings, Product Catalogue. *Note if this course is already listed in our Product Catalogue ( the dropdown list when adding a training record or creating a course) you do not need to do this step.
3. Click the green plus icon on the right to add your course name. Ensure this is spelt correctly as it can not be updated once added. Click 'Save changes'.
4. Click 'Training Courses' in the navigation on the left.
5. Click 'New Course' to add a new course.

6. Select the name of your course *Note use the Filter option on the right to just show courses in your product catalogue.
7. Select Learn as the course type.
8. Select the language.
9. Select a Trainer from the list *Note if there is someone you need to add as a Trainer please follow the steps here.
10. Click Next.

11. Enter a Description i.e. course content, learning outcomes etc. and click Next.

12. Select a Certificate Template from the list.
13. Select the Certificate Validity.
14. Fields such as photo sign off, signature sign off, approval required, photo audit, time logged and can users fail question sets are option.
15. Click Next.

16. Ensure all notifications (email, text, app) are switched on by turning the toggle green.
17. Save Changes.

18. You can either Copy from existing course or Start with an empty template.
19. Starting with an empty template.
- Drag a chapter from the placeholders on the right to the centre of the screen.
- Drag the other content placeholders i.e. a video or a presentation.
- Drag your content into the 'Upload New Content' box if it has not previously been added to your account. Name your files sensibly as you can use this content for future courses also.
- Once they have been added to Skillko the content will be in the 'Available Course Contents' (underneath your Sample Question & Sample Answer section).
- You can then drag from this section to your Video or Presentation placeholder - hover over the placeholder until the text turns bold. You can rename the section by using the pen edit icon.
- Add your question set if required, you can add additional question & answer options from your 'Available Course Contents' by dragging them into the centre of the screen.
- Save Changes once you are happy with the course content.

20. Select the green pen icon and select Edit Course.
21. Update the top Status to Published
22. This course will now be available when onboarding users via Staff Onboarding, Onboard Staff and also via the Trainer app.
Learn Declaration Options
The declaration at the end of a Learn course is standard across courses and the text be edited and it is a tick box for the user to confirm they have completed the course. There is also the option to have photo capture and/or a signature at the end of the course if you wish.
If you want to include a specific declaration, you can add it as a question at the end of the course and marking the answer as 'correct'
How to create a Learn Revision
1. Click the 9 dots on the top right of the screen and click 'Trainer'.
2. Locate the Learn training course you want to create an additional revision for. (Go to Training courses in the left navigation menu and click the 'eye' icon).
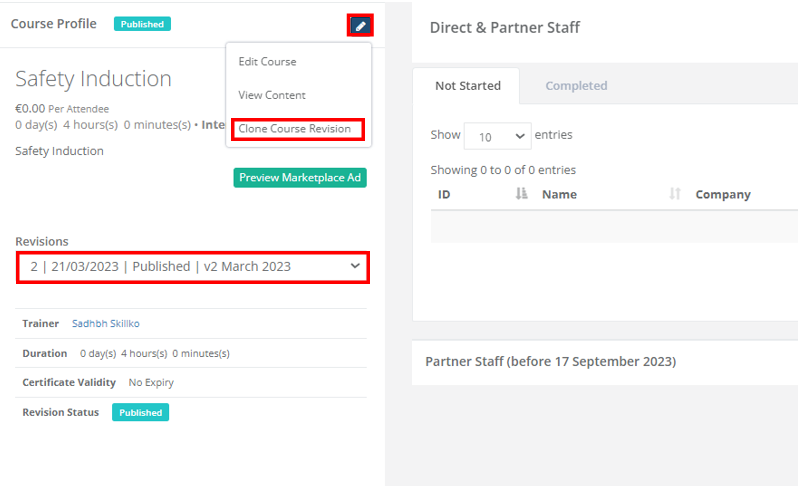
3. Click the edit icon on the Learn course and click 'Clone Course Revision'.

4. Add a name/code to the revision in the Course revision tab to differentiate it from the original course.
5. Update any of the course information if needed, change cert template/duration/ expiry date etc.
6. Click save and exit or Click save and Edit Course Structure if you have changes to make.
How to assign a Learn Course to an existing user
1. Click the 9 dots on the top right hand corner and click 'Trainer'.
2. Click 'Training Courses' from the menu on the left hand side.
3. Click the eye icon in the Actions column located to the right of the relevant training course.
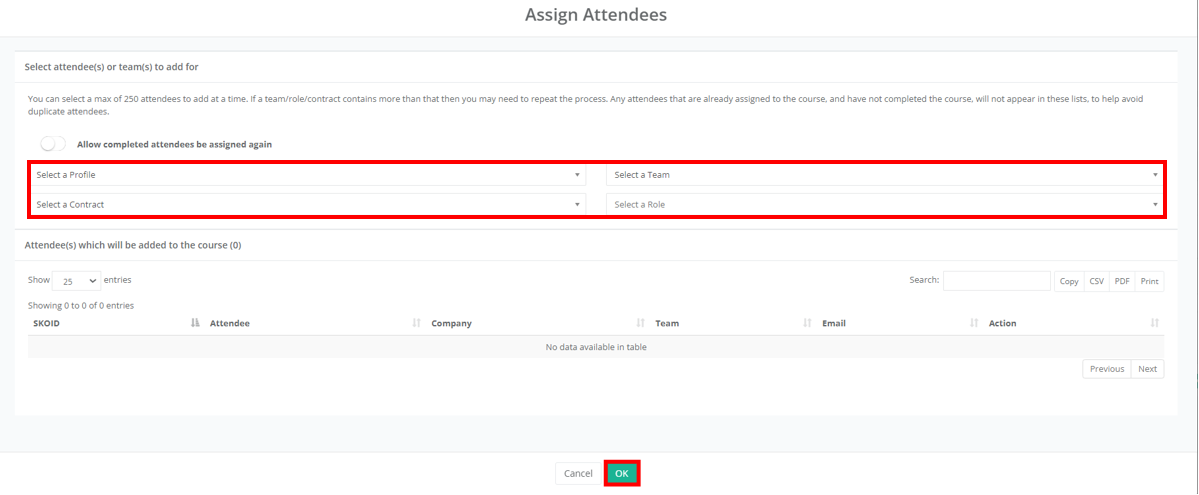
4. Click the green 'Assign Users' button.

5. Full admins can assign the course to a profile, contractor, team or role

6. Team admins can assign the course to the user profiles on their company account.
How to check who has not completed/completed Learn Courses
1. Click the 9 dots on the top right hand corner and click 'Trainer'.
2. Click 'Training Courses' from the menu on the left hand side.
3. Click the eye icon in the Actions column located to the right of the relevant training course.
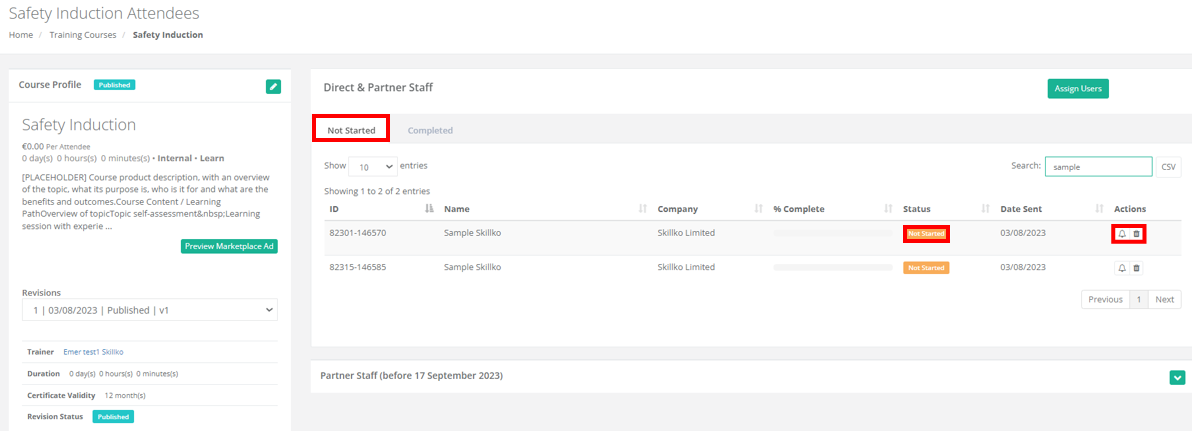
4. Under 'Not Started' is a list of people who have not started or yet to complete the course.
5. To send them a reminder, click the bell icon to the right of their name.
6. To remove them from the course, click the bin icon to the right of their name.

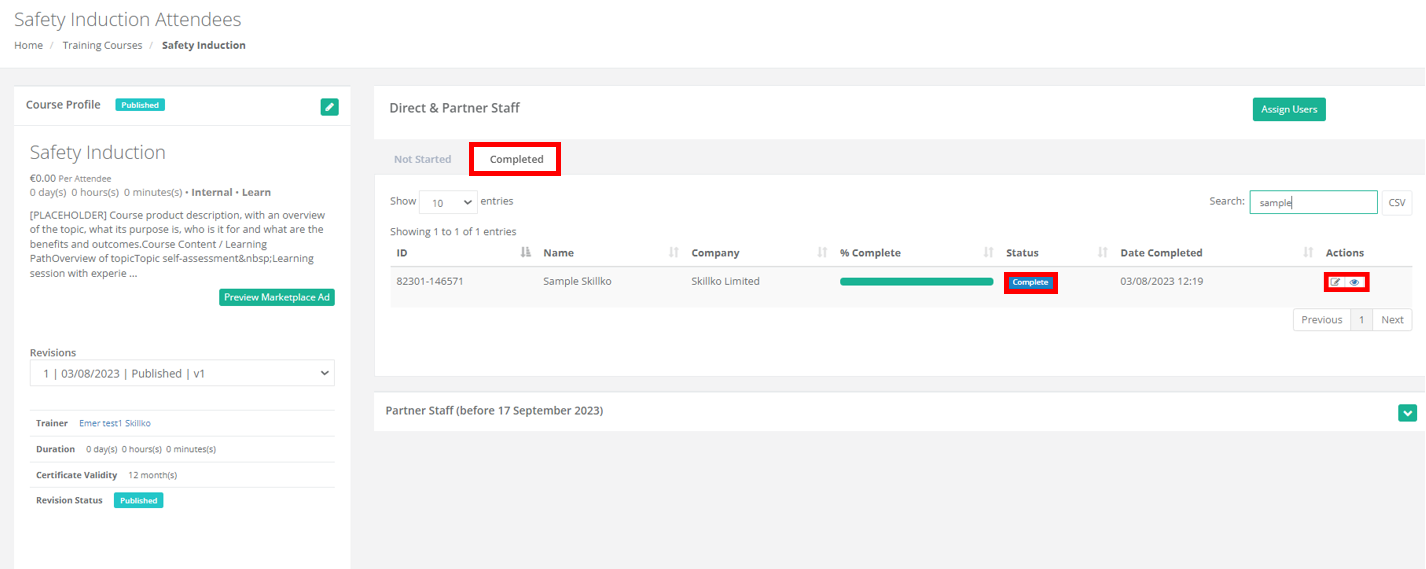
7. To check who has completed the course, click 'Completed'.
8. The date and time it was completed is visible beside their name.
9. To view the cert, click the eye icon in the actions column. This certificate is also visible on their user profile in the 'Compliance' app.